How to show the weather forecast in your Klaviyo Emails
Weather for Email has added a powerful new profile property called wfe_forecast_detail that gives you access to detailed weather forecasts for your email and sms campaigns in Klaviyo. This property provides detailed weather data for today plus the next 3 days, allowing you to create more targeted and relevant content for your subscribers.
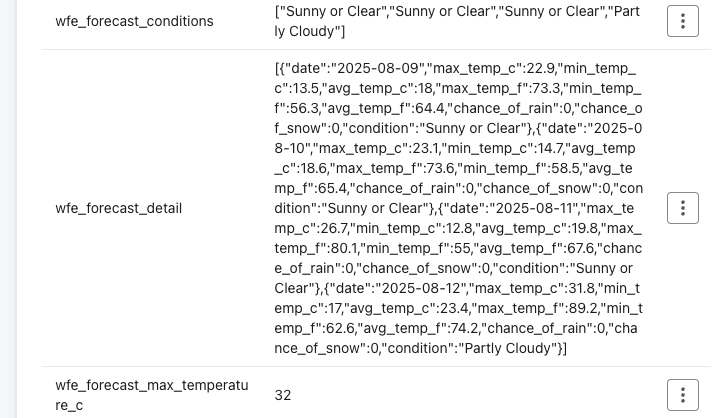
The wfe_forecast_detail property contains a JSON strong of weather forecast data that you can use directly in your Klaviyo email templates. It includes:
- Today's weather forecast
- Individual day forecasts for the next 3 days with the below information:
- Min Temperature Celsius/Fahrenheit
- Max Temperature Celsius/Fahrenheit
- Average Temperature Celsius/Fahrenheit
- The forecast condition (Rain, Sunny, Snow etc..)
- The percentage chance of rain
- The percentage chance of snow
- Date of weather forecast
This will allow you to show the exact weather forecast for a specific profile, like below
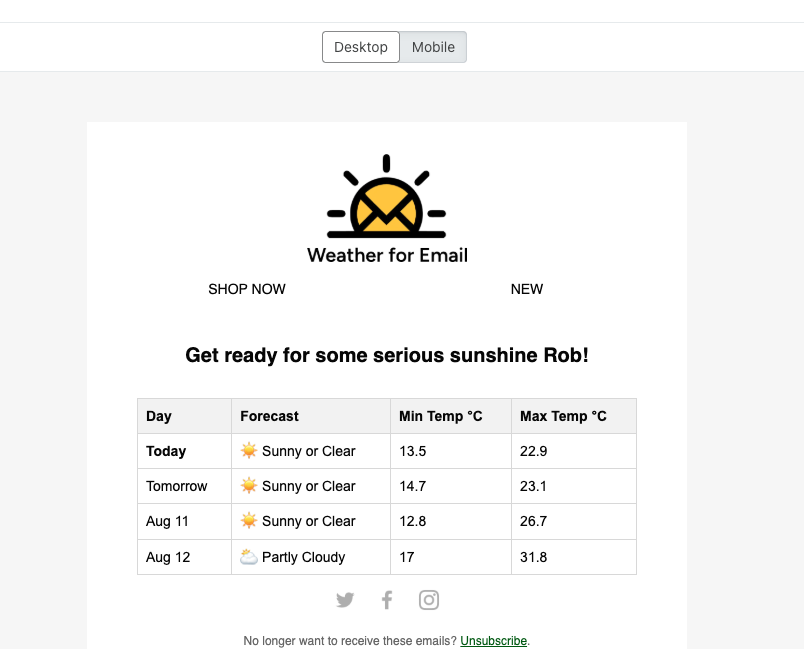
An example of the weather forecast in your email template
Use Cases for Detailed Weather Forecasts
1. Event Planning & Outdoor Activities
Perfect for businesses in sports, events, or outdoor recreation. Send emails with 4-day weather outlooks to help customers plan their weekend activities, camping trips, or sporting events.
2. Fashion & Retail Recommendations
Use the multi-day forecast to suggest complete outfit planning. "Here's what to wear this week" emails that show weather for each day alongside clothing recommendations.
3. Seasonal Product Promotions
Identify upcoming weather patterns to promote relevant products. If rain is forecasted for the next few days, promote umbrellas, indoor activities, or cozy home products.
4. Service-Based Businesses
Landscapers, contractors, or delivery services can inform customers about weather impacts on scheduling across the upcoming days.
5. Content Personalisation
Create weekly newsletters that include a personalised weather outlook, making your emails more valuable and engaging for subscribers.
How to Set it Up
Firstly, make sure you have the wfe_forecast_detail property enabled in your Weather Sync Settings. You can check this by logging into your weather for email account and selecting the weather sync
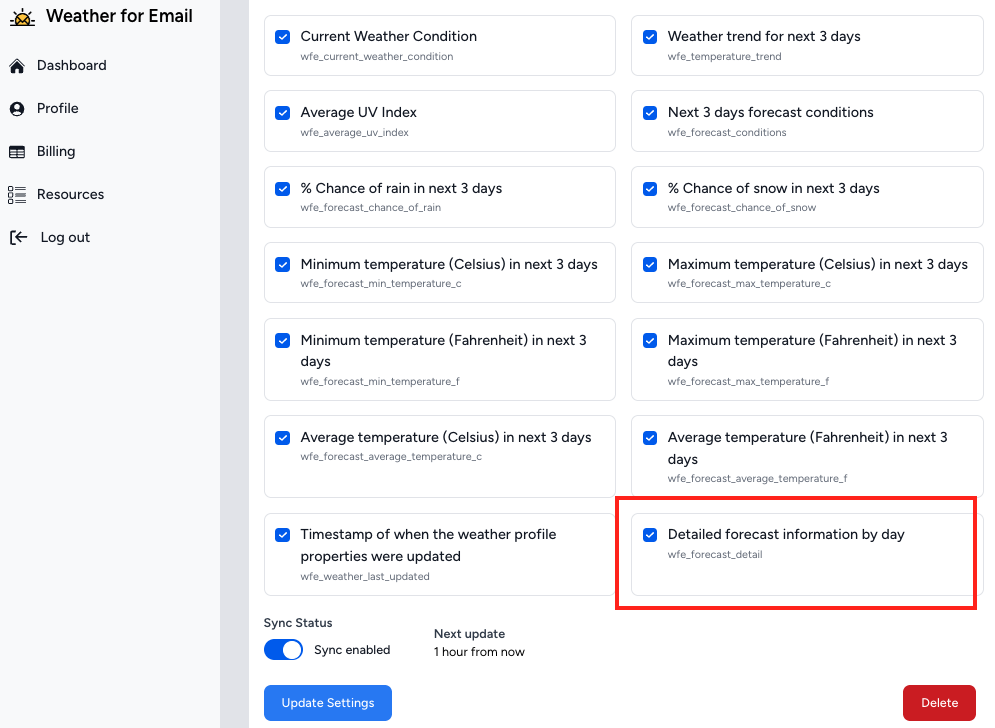
Enable the wfe_forecast_detail setting
Once you have enabled it, on the next sync you will see a new profile property appear in your Klaviyo account which contains a JSON string of all the weather forecast information
The new profile property
You can now reference this data directly inside a Klaviyo template
To do this, you use syntax like below as an example
Average temperature for today
{{person.wfe_forecast_detail|string_to_object|lookup:'0'|lookup:'avg_temp_c'}}
Forecast conditions for today
{{person.wfe_forecast_detail|string_to_object|lookup:'0'|lookup:'condition'}}
Average temperature for tomorrow
{{person.wfe_forecast_detail|string_to_object|lookup:'1'|lookup:'avg_temp_c'}}
Forecast conditions for tomorrow
{{person.wfe_forecast_detail|string_to_object|lookup:'0'|lookup:'condition'}}
The first "lookup" references each day for the forecast
- 0 = today
- 1 = tomorrow
- 2 = 2 days time
- 3 = 3 days time
and the second "lookup" references the weather property you want to show in the email.
Example of full weather table
You can use below as an example to use in your Klaviyo account. It shows the weather for today and the next 3 days in a table format. You can modify the properties as needed.
You can add this into a HTML block or a text block in Klaviyo (add in the source code) if you prefer to use more of Klaviyo's visual styling.
{% with day0=person.wfe_forecast_detail|string_to_object|lookup:'0' day1=person.wfe_forecast_detail|string_to_object|lookup:'1' day2=person.wfe_forecast_detail|string_to_object|lookup:'2' day3=person.wfe_forecast_detail|string_to_object|lookup:'3' %}
<table border="0" cellpadding="8" cellspacing="0" width="100%" style="border-collapse: collapse; font-family: Arial, sans-serif; max-width: 500px; margin: auto; border: 1px solid #ddd;">
<thead>
<tr style="background-color: #f4f4f4; text-align: left;">
<th style="border: 1px solid #ddd;">Day</th>
<th style="border: 1px solid #ddd;">Forecast</th>
<th style="border: 1px solid #ddd;">Min Temp °C</th>
<th style="border: 1px solid #ddd;">Max Temp °C</th>
</tr>
</thead>
<tbody>
<tr>
<td style="border: 1px solid #ddd; font-weight: bold;">Today</td>
<td style="border: 1px solid #ddd;">
{% if "Sunny" in day0.condition or "Clear" in day0.condition %}
☀️ {{ day0.condition }}
{% elif "Cloudy" in day0.condition %}
⛅ {{ day0.condition }}
{% elif "Rain" in day0.condition %}
🌧️ {{ day0.condition }}
{% elif "Snow" in day0.condition %}
❄️ {{ day0.condition }}
{% else %}
🌤️ {{ day0.condition }}
{% endif %}
</td>
<td style="border: 1px solid #ddd;">{{ day0.min_temp_c }}</td>
<td style="border: 1px solid #ddd;">{{ day0.max_temp_c }}</td>
</tr>
<tr>
<td style="border: 1px solid #ddd;">Tomorrow</td>
<td style="border: 1px solid #ddd;">
{% if "Sunny" in day1.condition or "Clear" in day1.condition %}
☀️ {{ day1.condition }}
{% elif "Cloudy" in day1.condition %}
⛅ {{ day1.condition }}
{% elif "Rain" in day1.condition %}
🌧️ {{ day1.condition }}
{% elif "Snow" in day1.condition %}
❄️ {{ day1.condition }}
{% else %}
🌤️ {{ day1.condition }}
{% endif %}
</td>
<td style="border: 1px solid #ddd;">{{ day1.min_temp_c }}</td>
<td style="border: 1px solid #ddd;">{{ day1.max_temp_c }}</td>
</tr>
<tr>
<td style="border: 1px solid #ddd;">{{ day2.date|format_date_string|date:'M d' }}</td>
<td style="border: 1px solid #ddd;">
{% if "Sunny" in day2.condition or "Clear" in day2.condition %}
☀️ {{ day2.condition }}
{% elif "Cloudy" in day2.condition %}
⛅ {{ day2.condition }}
{% elif "Rain" in day2.condition %}
🌧️ {{ day2.condition }}
{% elif "Snow" in day2.condition %}
❄️ {{ day2.condition }}
{% else %}
🌤️ {{ day2.condition }}
{% endif %}
</td>
<td style="border: 1px solid #ddd;">{{ day2.min_temp_c }}</td>
<td style="border: 1px solid #ddd;">{{ day2.max_temp_c }}</td>
</tr>
<tr>
<td style="border: 1px solid #ddd;">{{ day3.date|format_date_string|date:'M d' }}</td>
<td style="border: 1px solid #ddd;">
{% if "Sunny" in day3.condition or "Clear" in day3.condition %}
☀️ {{ day3.condition }}
{% elif "Cloudy" in day3.condition %}
⛅ {{ day3.condition }}
{% elif "Rain" in day3.condition %}
🌧️ {{ day3.condition }}
{% elif "Snow" in day3.condition %}
❄️ {{ day3.condition }}
{% else %}
🌤️ {{ day3.condition }}
{% endif %}
</td>
<td style="border: 1px solid #ddd;">{{ day3.min_temp_c }}</td>
<td style="border: 1px solid #ddd;">{{ day3.max_temp_c }}</td>
</tr>
</tbody>
</table>
{% endwith %}
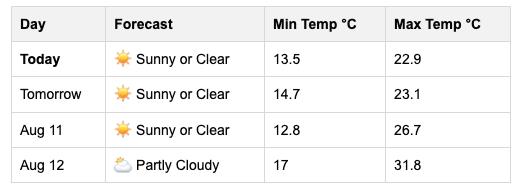
The end result
Make sure when you preview the email template, that you use a profile with the wfe_forecast_detail property, otherwise nothing will show
You might want to add display logic in your email template to make sure it only shows for profiles who have had weather information added to their profile. You can do this using Klaviyo's display logic on the block with the below configuration
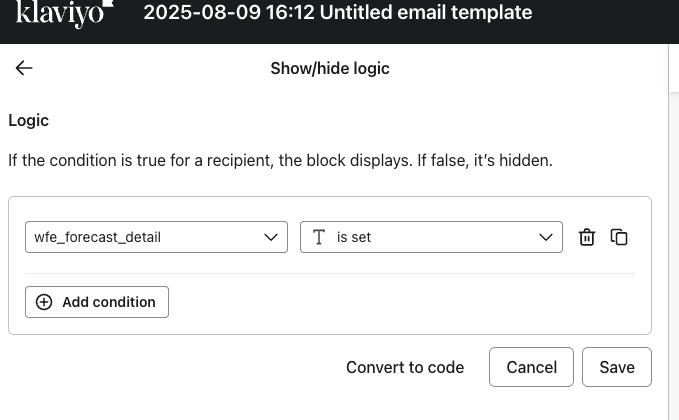
The show/hide logic for the weather block
Further customisation
You will notice in the sample template provided, we output the date in the email template. You can customise the format of this using Klaviyo's date filters if you so wish
For example
{{ day2.date|format_date_string|date:'d M, o'}}
